


In the following steps, we explain:
- how to install the MAN-cats® III test and diagnostic software and
- how to start-up the MAN Vehicle Communication Interface (VCI) T200.
Download MAN-cats® III diagnostics from the MAN Service Portal now
Quick Guide
Our Quick Guide for installing the MAN-cats® III diagnostic software is available at the top right in the download area (PDF).
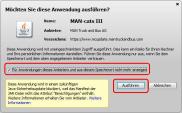
- In the Java security warning, activate the “Do not display for applications from this provider or this storage location” checkbox in order to avoid the security message in future.
- Press the “Run” button to confirm the security warning.
Note: The appearance of the security message may vary according to the version of Java installed.
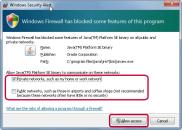
- Check that the “Private networks …” checkbox is activated and the “Public networks ….” checkbox is deactivated in the Windows firewall security message.
- Press the “Allow access” button to continue.
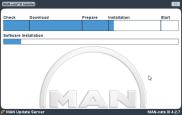
- The progress of the download and the subsequent installation process will be displayed.
- Click “Yes” to confirm the Windows message that appears during the installation process about user account control.
- Restart the computer after installing the software packages.

After restarting the computer, the MAN-cats® III test and diagnostic software starts automatically and various diagnostics packages are subsequently installed.
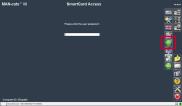
Installation is complete when the MAN-cats® III login screen is displayed.
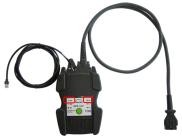
- Connect your MAN VCI T200 to the diagnostic socket in a vehicle and wait until the ready indicator is constantly lit.
- Connect your computer and the MAN VCI T200 with a network cable and wait until the LED with the computer symbol is constantly lit.
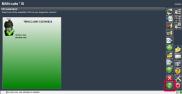
- Start the MAN-cats® III VCI Manager by pressing the green “VCI” button.
- Press the “Start” button to start the VCI application.
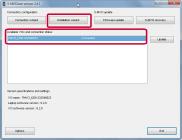
- Connect the MAN VCI T200 displayed under “Available VCIs and connection status” by double-clicking with the computer.
- Press the “Installation wizard” button to continue.
- Select your MAN VCI T200 from the list and press “Next” to confirm.
- Apply the suggested network settings by pressing “Next”.
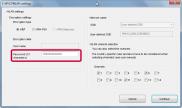
- Enter a password to save the WLAN settings. Apply the remaining settings and press “Next” to confirm.
- Note the following message window and press “Next” to continue.
- As requested, remove the network cable between the computer and the MAN VCI T200 and press “Next”.
- Confirm the success message by pressing “Next” and then press “Finish” to close the installation wizard.
- Click in the grey area of the displayed MAN VCI T200 to update the settings.
- Once the background colour has changed from grey to green, the connection is set up between the computer and the MAN VCI T200.
- Close the VCI Manager by clicking on the green confirmation button and close the start-up.
